Installation for Beginner
This chapter should help with getting OpenDBM set up on your system. OpenDBM is meant to be accessible to everyone––including folks who are not necessarily technical. If you feel comfortable with terminal, git, and docker, skip to Section 2.2. For everyone else, Section 2.1 accomplishes the same steps in Section 2.2––just with a lot more guidance along the way.
OpenDBM installation for beginners
Alright, you want to measure digital biomarkers from your data but all of this pretty much just feels like magic right now. No worries, you do not need to know how to code to use OpenDBM. We’ll break it down for you. Let’s get started.
Install GitHub and clone OpenDBM
GitHub is just where we––and most other people––store code and other stuff. They do so in ‘repositories’ or ‘repos,’ which are basically just folders of code (and other stuff). The first thing you’re going to do is clone i.e. copy/download the OpenDBM repo from GitHub into a folder on your computer. You can do this manually, even though that’s lame, or by using the GitHub CLI.
- The manual way
- The better way
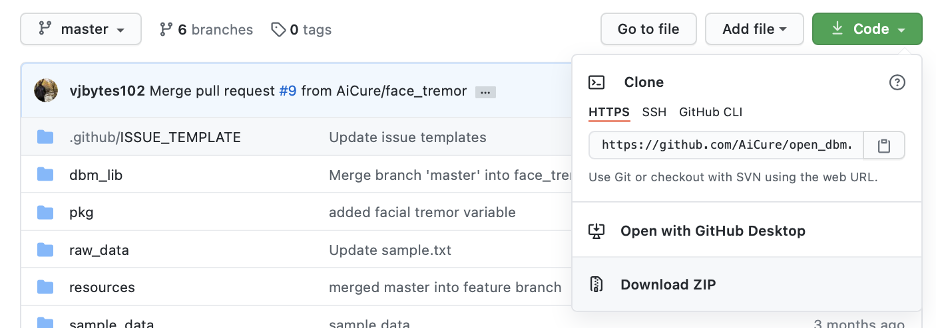
Then, you can save the (unzipped) folder anywhere you want on your computer. Make sure it’s an easy location since you’ll have to navigate to it a lot to use OpenDBM.
GitHub also has a command line interface (CLI) that allows you to conduct a lot of GitHub-related operations straight from your Terminal (if you’re on Mac/Linux) or Command Prompt (if you’re on a PC). This is really helpful down the road for a bunch of reasons.
To get started with GitHub CLI, just follow the instructions they’ve laid out on their website.
Once you’re done with that, you can use the GitHub CLI to clone OpenDBM.
But first, let’s open Terminal / Command Prompt and navigate to the folder where you want to store the OpenDBM code. If you have never used Terminal or Command Prompt before, no worries: These are good links for quick primers on navigating folders in Mac and Windows.
Once you’re in the folder where you want to clone OpenDBM, you can use git clone by pasting the command shown below into Terminal / Command Prompt and hitting Enter. Once you do that, it’ll download the OpenDBM code from GitHub onto your system (this will take a little bit).
git clone https://github.com/AiCure/open_dbm.git
Once that’s done, you should be able to see a folder in your Finder / File Explorer (or from within Terminal / Command Prompt, of course) called open_dbm with all the contents you saw listed on the GutHub repo. Now we’re getting somewhere.
Install Docker and build your images
Anytime you install a proper application on your computer (e.g. let’s say you download Spotify or Skype), it will most likely come with all the things it needs to be able to run successfully. I’m sorry to say this is absolutely not the case when downloading software from GitHub.
As has been mentioned before, OpenDBM is built ‘on top of’ a bunch of existing open source tools. That means it depends on a lot of other software to function and do the things it needs to do. And the user is responsible for scouring the internet for OpenDBM’s ‘dependencies,’ listed in the requirements.txt file that comes with it, and installing each and every one of them.
Normally, that’s exactly what you’d have to do––and we wouldn’t feel bad about it; it’s just how things are. But, we found that some of OpenDBM’s critical dependencies, such as OpenFace, are actually quite finicky to install––even for pros. So, we’ve come up with a solution.
We’re happy to report that OpenDBM does indeed come with all its dependencies. But there are a few extra steps involved to make that work––and it requires learning a bit about Docker.
Get familiar with docker
As is so wonderfully summarized on this website, “Docker is an open-source project for automating the deployment of applications as portable, self-sufficient containers that can run on the cloud or on-premises. Docker is also a company that promotes and evolves this technology.”
Basically, it packages up all the dependencies that you would otherwise have to install into a ‘container,’ where all dependencies conveniently come pre-installed. So, as long as you’re using OpenDBM from within that container, you need not worry about all the dependencies.
This will all make more sense in a bit.
So, follow the instructions on the Docker website to install Docker on your system. We recommend you use the latest stable version. Once downloaded and installed, launch Docker, open Terminal / Command Prompt, and check the version to ensure that Docker is properly installed and running:
NOTE for Windows User: Please use the instruction here to install docker and/or enable WSL 2 as Docker Integration
% docker --version
Docker version 19.03.12, build 48a66213fe
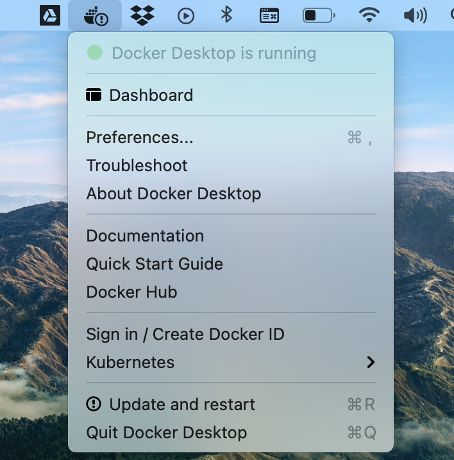
If you’re on a Mac, Docker should also show up in your Menu bar (I would give a screenshot for PC too but unfortunately I don’t have one). Make sure it states ‘Docker Desktop is running’
Build Docker image
When you cloned OpenDBM onto your computer, it contained a Docker file (you can see for yourself; it’s called Dockerfile). This file is basically a set of instructions that will create the docker image upon which the aforementioned Docker container will be built. Don’t sweat the details; you can build the Docker image just by using a single command.
While in Terminal / Command Prompt, navigate to the inside of the folder where you cloned OpenDBM. So, if you cloned OpenDBM in /Users/JohnWick, then cd into the open_dbm folder so that when you type the pwd command, you should see that you’re in /Users/JohnWick/open_dbm. From here, run the following command:
% docker build --tag dbm .
This should set off an installation script to build the docker image. It will take some time to run. On a regular Macbook Pro, that’s around 20-40 minutes to fully execute.
Once it’s done running, you can run the following command and it should show you the Docker image that you just created.
% docker images

REPOSITORY     TAG        IMAGE ID         CREATED         SIZE
dbm            latest     4ad5c2b21553     2 hours ago     4.98GB
If you run into any problems here, please use the Issues tab on the OpenDBM GitHub page to report the error you see and we will try our best to resolve it as soon as possible. We’ve even created an Issue template for you to follow that should pop up automatically.
Let’s say you don’t run into any issues and everything runs smoothly. You’re… kinda done with installation. You can skip Installation for Pro. Chapter 3 will go over how to use OpenDBM to calculate digital biomarkers from your data. Good news: That also just requires a single command.
Now that you’ve covered OpenDBM installation, let’s dive deeper on some of these core modules by looking at Usage.